HomeTurtlegraficsGPanelRobotics WebTigerPython
 Python - Online
buttons
Deutsch   English   

6. BUTTONS & SOUND


YOU LEARN HERE...


how to use the two micro:bit buttons to develop interactive programs. You will also learn how to play sound with your robot.


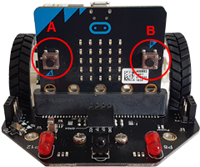
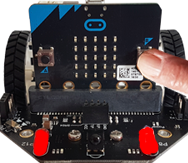
HOW THE BUTTONS WORK


The micro:bit has two programmable buttons that allow you to interactively influence the program flow during execution. The left one is addressed with the variable button_a, the right one with button_b.

The function button_b.is_pressed() returns True if button B is pressed (analogous to button_a.is_ pressed()).

The function button_a.was_pressed() returns True if button A was pressed briefly (analogous to button_b.was_pressed()).


EXAMPLES


Example 1: The LEDs flash when button B is pressed

The program waits in an infinite loop until the right button is pressed. As long as the button is pressed, the LEDs are switched on and off every 400 milliseconds.

Program:

from microbit import *
from mbrobot import *
#from mbrobot_plus import *

repeat:
    if button_b.is_pressed():
        setLED(1)
        delay(400)        
        setLED(0)
        delay(400)
► Copy to clipboard
 

The commands for the buttons are in the microbit module, which you must also import.


Example 2: Sound is played when a button is clicked
A short melody is to be played when button A or B is clicked. The button_a.was_pressed() function returns True if button a has been pressed.

The robot is equipped with a buzzer that can play sounds and melodies. Make sure that the buzzer switch is set correctly. Thel play(JUMP_UP) command from the musicmodule plays a short melody. Some melodies are built into the music module.


Program:

from microbit import *
from mbrobot import *
#from mbrobot_plusV2 import *
from music import *

repeat: 
    if button_a.was_pressed():
        play(JUMP_UP)

    if button_b.was_pressed():
        play(JUMP_DOWN)   
► Copy to clipboard


Example 3: Aborting a program with a button

With moving robots, it is advantageous to use an endless loop that is only repeated until a button is pressed.

The robot moves to the obstacle, which it detects with its ultrasonic sensor, and back again..


As long as button A has not been pressed, the robot repeats the commands in thewhile-Schleife. The loop is ended with the button click and the robot stops with the stop()command.

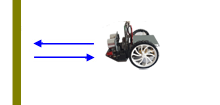
Programm:

from microbit import *
from mbrobot import *
#from mbrobot_plus import *

setSpeed(30)
forward()
while not button_a.was_pressed():
    d = getDistance()
    if d < 10:
        backward()
        delay(1000)
        forward()
    delay(200)
stop() 
► Copy to clipboard

Example 4: Controlling the robot with buttons

Click on button a or b to guide the robot through a labyrinth. The robot moves forwards, when it “sees” dark with its light sensors it moves back briefly and stops. If you press button a, it turns 90° to the left and moves forward again until it reaches the next dark edge. Click on button b to turn right.


Program:

from microbit import *
from mbrobot import *
#from mbrobot_plus import *

forward()
repeat:
    v = irLeft.read_digital()
    if v == 0:
        backward()
        delay(500)
        stop()
    if button_a.was_pressed():
        left()
        delay(550)
        forward()
    elif button_b.was_pressed():
        right()
        delay(550)     
        forward()
    sleep(10)
► Copy to clipboard


REMIND YOU...


You can use buttons to develop interactive programs. The is_pressed() function returns True if the button is pressed. The was_pressed() function returns True if the button has been clicked at any time since the program was started or since the last call.


TO SOLVE IT YOURSELF


1.

Clicking on the button a triggers the alarm, clicking on the button b calls the command setAlarm(0) and stops the alarm.


2.

Click on button a to make the robot move forwards and stop for 2000 milliseconds, click on button b to make it move backwards and stop for 2000 milliseconds.

3.

The robot should drive through the courses by clicking on button a or button b to tell it whether it should turn left or right.


4.

In Chapter 2 under Supplement you can look up how to switch the LEDs on and off individually. Write a program that switches the left LED on and the right LED off when the left button is clicked and switches the right LED on and the left LED off when the right button is clicked.

5.

Test the buzzer of your robot. If you have micro:bit V2, the sound can be played either with the buzzer on the micro:bit or with the buzzer on the robot board. You can set it with the buzzer switch (see example 2).

Import the music module into your program and play some melodies with the command play(sound) some melodies. The list of predefined melodies can also be found in the documentation.

You can use the pitch(784, 400) command from the music module to play individual tones. The first parameter is the tone frequency, the second is the playback duration.


6-1
Notes:

Melodys, in Modul music :

ADADADUM - Beethoven 5. Sinfonie in C Moll
ENTERTAINER - Scott Joplin Ragtime
PRELUDE -J.S.Bach 48 Preludien and Fuges
ODE - Ode an Joy Thema aus Beethoven 9. Sinfonie in D Moll
NYAN - Nyan Cat Thema
RINGTONE - Phone
FUNK - secret agents
BLUES - ein Boogie-Woogie Blues
BIRTHDAY - Happy Birthday to You...
WEDDING - Wagner Oper Lohengrin
FUNERAL - Chopin Klaviersonate
PUNCHLINE - Tonclip
PYTHON - Monty Python Flying Circus
BADDY - The Baddy
CHASE - Jagdszene
BA_DING - Signaltone
WAWAWAWAA - Posaunenklang
JUMP_UP - for games, go up
JUMP_DOWN - for games, go down
POWER_UP - power up
POWER_DOWN - power downt