HomeTurtlegraficsGPanelRobotics WebTigerPython
 Python - Online
bewegen
Deutsch   English   

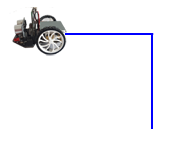
2. MOVING ROBOTS (MOTORS and LEDs)


YOU LEARN HERE...


the most important commands you can use to control your robot.


EXAMPLES

  Example 1: Drive and turn
Der Roboter soll zuerst vorwärts fahren, dann links abbiegen und danach wieder ein kurzes Stück vorwärts fahren.

The robot should first drive forwards, then turn left and then drive forwards again for a short distance.

The lines of your programme are executed in sequence. The forward()command sets the robot to the ‘forward’ state. delay(2000)specifies the time in milliseconds until the microprocessor issues the next left()command. This sets the robot to the ‘turn left’ state. During the 550 milliseconds, the robot turns approx. 90° to the left. It then moves forwards again for 2000 milliseconds before it receives the stop() command.


Program:

from mbrobot import *
#from mbrobot_plus import *

forward()
delay(2000)
left()
delay(550)
forward()
delay(2000)
stop()
► Copy to clipboard

We refrain from displaying the import line for the Maqueen Plus V2 in all programme examples. If you are working with this model, the import line is

from mbrobot_plusV2 import *


Example 2: Doing more than one thing at the same time
Although the following programme consists of a sequence of instructions that are executed one after the other, the robot can do several things at the same time. The robot moves forwards for 4 seconds and then backwards for 4 seconds. While travelling backwards, it switches the LEDs on and off.

The motors and the LEDs are controlled by the microprocessor, whereby the microprocessor can also operate several actuators simultaneously. While the motors are in the backward state after receiving the backward()command, the LEDs are switched on and off with the.

setLED(1) switches on the LEDs and switches them off after 3000 ms with setLED(0). After a further 1000 ms, the motors receive the stop() command and the robot stops.  

Program:

from mbrobot import *
#from mbrobot_plus import *

forward()
delay(4000)
backward()
setLED(1)
delay(3000)
setLED(0)
delay(1000)
stop()
► Copy to clipboard

With the Maqueen Plus, the LEDs can also light up in other colours (1:red, 2:green, 3:yellow, 4:blue, 5:pink, 6:cyan, 7:white)


Example 3: Travelling on an arc
The robot should first travel on a left-hand arc for 5 seconds, then on a right-hand arc for 5 seconds and stop. Use the commands leftArc(r) or rightArc(r) for the arc, where the radius r is in metres.

You can change the speed with setSpeed(speed)You can select values between 0 and 100 as speed. The default speed is 50.


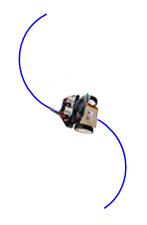
Program:

from mbrobot import *
#from mbrobot_plus import *

setSpeed(40)
leftArc(0.2)
delay(5000)
rightArc(0.2)
delay(5000)
stop()
► Copy to clipboard


REMEMBER YOU...


The following commands are available for controlling the robot:

 forward()  moves forwards
 backward()  moves backwards
 left()  turns left
 right()  turns right
 leftArc(r)  moves to left arc with radius r
 rightArc(r)  rightArc(r) moves to right arc with radius r
 stop()  stops
 setSpeed(speed)  sets the speed (default 50)
 delay(ms)  remains in the same state for ms milliseconds
 setLED(1)  switch on LEDs (mbRobot_plus 1, 2, 3, 4, 5, 6, 7))
 setLED(0)  switch off LEDs
 setAlarm(1)  switches on a pip tone
 setAlarm(0)  switches the pip tone off

When programming robots, you have to think in terms of states. The forward() function sets the robot in a forward motion. While the motors are in this state, the microprocessor can issue commands to other actuators.

You can abort a running programme at any time by setting the small switch on the back of the robot chassis to ‘OFF’.


TO SOLVE BY YOURSELF


1.

Create a course with some objects and write a programme so that the robot moves from the start to the finish.


2.

The robot should move along an arc to the left until it has travelled a complete circle. It should then move along a right-hand arc for the same length of time.


3.

An alarm is switched on with setAlarm(1) (a pip tone). setAlarm(0) switches the alarm off. The robot should first move forwards for 5000 ms and then backwards for 5000 ms. It should switch on the alarm while travelling backwards.

To be able to use the setAlarm() command, you must import the mbalarm module.

The programme opposite switches the alarm on for 3000 ms.

 
from mbrobot import *
from mbalarm import *

setAlarm(1)
delay(3000)
setAlarm(0)


SUPPLEMENT: CONTROLLING MOTORS AND LEDs INDIVIDUALLY


The forward(), left() etc. commands control the entire running gear, which consists of two motors. However, you can also switch on the individual motors and control their speed. With motL.rotate(speed), the left motor is set to forward motion and rotates at the speed speed. For positive speed values the motor rotates forwards, for negative values it rotates backwards and for speed = 0 the motor stops. The motR.rotate(speed) command works in the same way for the right-hand motor.


Example 4: Move only left motor
The left motor first runs forwards for 3 seconds at a speed of 50, then backwards for 2 seconds at a speed of 30. It then stops.

Program:

from mbrobotmot import *
#from mbrobot_plus import *

motL.rotate(50)
delay(3000)
motL.rotate(-30)
delay(2000)
motL.rotate(0)
► Copy to clipboard


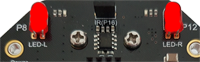
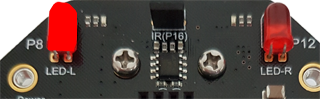
Example 5: Switching LEDs on and off individually
You can use the setLED(1) and setLED(0) commands to switch both LEDs on and off at the same time. If you look closely at the circuit board of your robot, you will see that the left LED is labelled LED-L and the right LED is labelled LED-R. You can also address the LEDs individually:

For the mbRobot, use the following commands:
ledLeft.write_digital(1) switches on the left LED
ledLeft.write_digital(0) switches the left LED off
ledRight.write_digital(1) switches the right LED on
ledRight.write_digital(0)switches the right LED off

Your programme switches one LED on and the other off.


Program:

from mbrobot import *

ledLeft.write_digital(1)
ledRight.write_digital(0)
delay(600)
ledLeft.write_digital(0)
ledRight.write_digital(1)
delay(600)
ledLeft.write_digital(1)
ledRight.write_digital(0)
delay(600)
ledLeft.write_digital(0)
► Copy to clipboard

With the Maqueen Plus and Maqueen PlusV2, you can switch the LED individually with the following commands:
setLEDLeft(1) switches on the left LED
setLEDLeft(0) switches the left LED off
setLEDRight(1) switches the right LED on
setLEDRight(0) switches the right LED off

Program:

from mbrobot_plus import *
from mbrobot_plusV2 import *

setLEDLeft(1)
setLEDRight(0)
delay(600)
setLEDLeft(0)
setLEDRight(1)
delay(600)
setLEDLeft(2)
setLEDRight(0)
delay(600)
setLEDLeft(0)
setLEDRight(2)
delay(600)
setLEDRight(0)
► Copy to clipboard


Example 6: RGB LEDs (Maqueen Plus V2 only)

Maqueen Plus V2 has four RGB LEDs on the lower side of the robot. You can make them light up in different colours using the setRGB(id, r, g, b)command, where id is the number of the LED, r is the red, g is the green and b is the blue colour component. clearRGB() switches off all the LEDs.

In your programme, the first LED is switched on red, the second green, the third blue and the fourth violet. Then all 4 are switched off.


Program:

from mbrobot_plusV2 import *

repeat 3:
    setRGB(0, 255, 0, 0)
    delay(1000)
    setRGB(1, 0, 255, 0)
    delay(1000)
    setRGB(2, 0, 0, 255)
    delay(1000)
    setRGB(3, 255, 0, 255)
    delay(1000)
    clearRGB()
► Copy to clipboardn


TO SOLVE BY YOURSELF


4.

Let the two motors rotate forwards at the same speed for 4000 milliseconds.

5.

Run the left motor forwards and the right motor backwards for 4 seconds.

6.

How do you have to control the left and right motors so that the robot moves in a left-hand arc for 4 seconds?

7.

Complete example 3 so that when the robot is travelling on the left-hand arc, the left-hand LED lights up and when it is travelling on the right-hand arc, the right-hand LED lights up and the left-hand LED is switched off.