| HomeTurtlegraficsGPanelRobotics WebTigerPython |
| Python - Online |
| Deutsch English |
8. NEOPIXEL
![]()
WHAT ARE NEOPIXELS |
In the foreseeable future, there will only be light sources that are made of LEDs. An LED is a semiconductor diode that converts the current flowing through it into light with a high degree of efficiency. Depending on the material, different colors can be produced. If you combine a red, green and blue LED in one housing, the result is a color LED that can be used to produce any other color through additive color mixing. The principle is also used in color television. Color LEDs are sometimes combined with an electronic circuit (controller) in the same housing and cascaded in series. With only 3 supply lines, it is still possible to give each individual LED a different color. The LEDs are usually mounted on an LED strip. However, there are also rings or rectangular arrangements (matrix). In the following, you use either an LED strip, an LED ring or an LED matrix with at least 12 LEDs. These must be of type WS2812B. Sources of supply: Electronics stores, online shipping (Adafruit, Seed, Pi-Shop, Ebay, Aliexpress, etc.) |
PROGRAMMING WITH FUN |
A lighting system controlled by a microcontroller such as the micro:bit is extremely flexible and versatile, and it is entirely up to your imagination and ingenuity when writing the control program what you end up seeing. In this worksheet you will learn some basic procedures that you can then apply to your own project. As you will see, programming lighting systems is fun because the effects of each program line are immediately visible. Translated with www.DeepL.com/Translator (free version) |
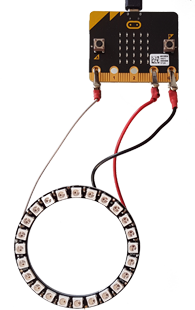
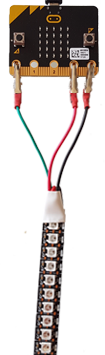
CONNECTION |
|
TASK 1: SET PIXELS TO A SPECIFIC COLOR |
The NeoPixels are controlled by means of a serial protocol. The 3 color values are sent in sequence for the first pixel, then for the second and so on. The first pixel “grabs” its values and forwards the rest of the data stream. Under MicroPython, programming is very simple: you create an “object” NeoPixel by specifying which is the data port (usually pin0) and how many NeoPixels your arrangement has, i.e. for 24 LEDs: np = NeoPixel(pin0, 24) A list with 24 tuples is now created in the memory system, which can hold the RGB colors of the 24 LEDs (as (R, G, B) color values each in the range 0..255).
As you can see, in addition to the microbit module, you also need to import the neopixel module. If you forget the np.show(), you will not see any change in the colors, as your LEDs only receive the data stream when this call is made. |
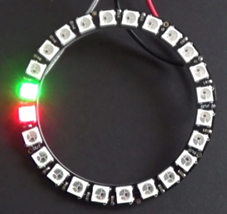
TASK 2: RUN A PIXEL |
|
TASK 3: LENGTHENING COLORED WORM |
|
TASK 4: CONTROL ALL LEDs BRIGHT/DARK |
|
TASK 5: FLICKERING CANDLES |
|
TASK 6: REALIZE YOUR OWN IDEAS |
Create a light show according to your own ideas.
|
![]()