how you can use the micro:bit to measure the magnetic field and determine the compass direction (the azimuth).
CALIBRATE SENSOR AND DISPLAY VALUES
You can use the Maggit statusnet field sensor to determine the position of the micro:bit in relation to the north direction in the same way as a compass. To do this, use the compass.heading() function, which returns the azimuth in degrees (positive to the east) when the board is horizontal.
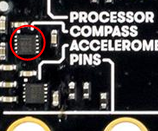
The sensor is clearly visible on your micro:bit and labelled COMPASS.
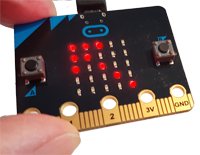
Before you can start measuring, you must calibrate the sensor with the compass.calibrate() function. After calling up the programme, it will block and the display will prompt you to tilt the micro:bit until all LEDs are activated.
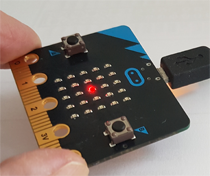
The image HAPPY is immediately shown on the display and the programme continues to run. In the endless loop, you write out the azimuth as an integer between 0 and 360. As usual, you can cancel the output in the terminal window with Ctrl + C.
Program:
from microbit import *

compass.calibrate()
while True:
    print(compass.heading())
    sleep(300)
As with a real compass, an arrow should appear on the display pointing approximately north.
Since you can only display arrows in 45-degree directions, divide the azimuth into 8 ranges and assign the arrow that fits best to each range. If the sensor has not yet been calibrated, you must first carry out the calibration.
Actually, you should also test the range limits for equality. However, as the sensor only returns integer values, you can dispense with this
Program:
from microbit import *
ifnot compass.is_calibrated():
print("Perform calibration please!")
compass.calibrate()
while True:
h = compass.heading()
print(h)
if h > 22.5 and h < 67.5:
display.show(Image.ARROW_NW)
elif h > 67.5 and h < 112.5:
display.show(Image.ARROW_W)
elif h > 112.5 and h < 157.5:
display.show(Image.ARROW_SW)
elif h > 157.5 and h < 202.5:
display.show(Image.ARROW_S)
elif h > 202.5 and h < 247.5:
display.show(Image.ARROW_SE)
elif h > 247.5 and h < 292.5:
display.show(Image.ARROW_E)
elif h > 292.5 and h < 337.5:
display.show(Image.ARROW_NE)
else:
display.show(Image.ARROW_N)
sleep(10)
Place a small magnet, like the ones you can find for memo boards, under a cardboard lid. You can think of the magnet as a mine that you have to find with the micro:bit as a mine detector. In your programme, the closer the board gets to the mine, the brighter the LED in the middle lights up.
You use the compass.get_field_strength() function, which returns the strength of the magnetic field.
Then you scale this measured value so that you get a brightness value between 0 and 9.
Program:
Warning: include(robotik/mb/bsp/Mb6c.html): Failed to open stream: No such file or directory in /var/www/html/engl/robotik/mb/kompass.inc.php on line 141
Warning: include(): Failed opening 'robotik/mb/bsp/Mb6c.html' for inclusion (include_path='.:/usr/local/lib/php') in /var/www/html/engl/robotik/mb/kompass.inc.php on line 141
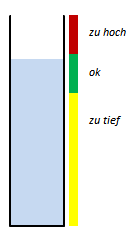
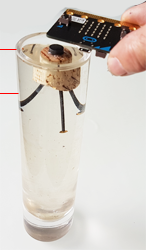
Your test system consists of a flower vase and a magnet attached to a floating cork cone. Using three nails, you can stabilise the peg so that the magnet always moves in the same vertical line as the water level changes.
The function get_fied_strength() returns the strength of the magnetic field. Depending on the strength of the magnet used, you still have to adjust the limit values in the programme.
It is best to imagine that the vessel is in three ‘states’, which you record with the variable state, which can take the values ‘high’, ‘ok’ and ‘low’. You use the scaled value of the magnetic field to decide whether the state changes.
You can switch off the sounds by pressing button A. If you do not have a sound available, you can also realise a different alarm display.
Program:
Warning: include(robotik/mb/bsp/Mb6d.html): Failed to open stream: No such file or directory in /var/www/html/engl/robotik/mb/kompass.inc.php on line 168
Warning: include(): Failed opening 'robotik/mb/bsp/Mb6d.html' for inclusion (include_path='.:/usr/local/lib/php') in /var/www/html/engl/robotik/mb/kompass.inc.php on line 168
The magnetic field sensor can be used as a compass sensor in conjunction with magnets or to determine the direction of the compass. In this application, it must be calibrated before first use.
TO SOLVE BY YOURSELF
1.
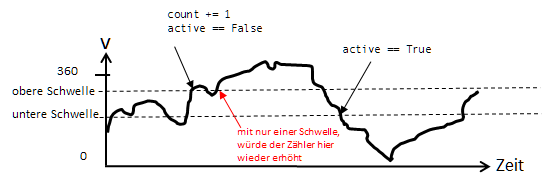
Build a ‘pirouette counter’: Every time you have rotated once around your own axis with the micro:bit in your hand, another LED on the display is switched on.
Instructions: When the micro:bit rotates, compass.heading() provides an irregular signal sequence.
A single switching level is not sufficient to count the revolutions; two levels must be defined. If the upper level is exceeded, the counter is incremented and counting is deactivated at the same time. Counting is only reactivated when the value falls below the lower level.
2.
Non-contact revolution counters (e.g. for wheels) often use a magnet that passes in front of a magnetic field sensor once for each revolution. Attach a small magnet (e.g. from a memoboard or a magnetic snapper) to a bicycle wheel and write a programme that writes out the number of revolutions in the terminal window. How can this be used to build a kilometre counter?
6-1
Didaktische Hinweise:
Das Programm kann man eleganter schreiben, indem man eine Liste mit allen 8 Pfeilen verwendet und die Winkelbereiche mathematisch unter Verwendung des Modulo-Operators berechnet. Für Schülerinnen und Schüler ist diese Lösung aber schwerer nachvollziehbar.
from microbit import *
ifnot compass.is_calibrated():
print("Perform calibration please!")
compass.calibrate()
while True:
h = compass.heading()
print(h)
h = (h - 22.5) % 360
i = 7 - int(h / 45)
display.show(Image.ALL_ARROWS[i])
sleep(100)