| Deutsch English |
![]()
YOU LEARN HERE... |
how to prepare the micro:bit for programming with WebTigerPython and how to run a programme with your robot. |
USB CONNECTION |
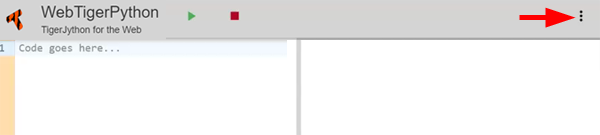
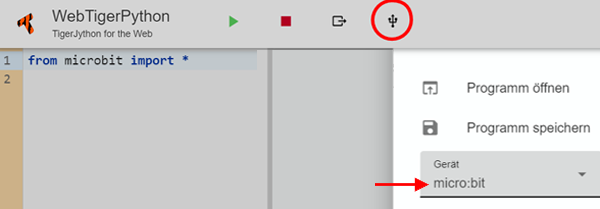
Your Python programmes are downloaded to the micro:bit via USB and executed there with MicroPython. The micro:bit must have firmware installed for this. The firmware is pre-installed on new micro:bits. If this is not the case, or if you have already programmed the micro:bit with another tool, you must reinstall the firmware. You can find instructions on how to do this below in the Install firmware section. A. Using the Chrome browserIt is best to start WebTigerPython with the Chrome browser. This supports WebUSB and access to the micro:bit from the browser. Select at the top right under the three dots Device - micro:bit.
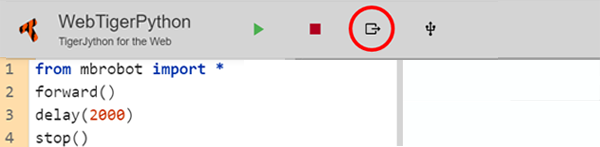
Click on the USB symbol in the title bar and then on ‘BBC micro:bitCMSIS-DAP’ and select Connect.
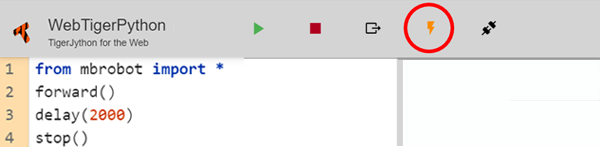
The micro:bit is now connected to your computer. A new yellow button will appear in the title bar, which you can use to download the programme.
To test, enter the robot programme in the editor window.
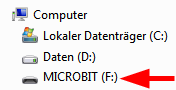
Depending on the robot model, you may need to adjust the import line Switch on the robot's power supply and click on the yellow download button to download the program to the robot's micro:bit. The programme will start automatically and the robot will move forward for 2000 milliseconds. B. Using other browsersIf you are using a different browser, you must first download the programme prepared for micro:bit to your computer and then copy (move) it to the MICROBIT drive. Start WebTigerPython and select Device - microbit under the three dots on the right. Enter a test programme for the robot in the editor window.
Depending on the robot model, you may need to adjust the import line Click on the Export code button . You must then enter the programme name (e.g. Ex1). The Ex1.hex file prepared for the robot will be downloaded to the download folder on your computer. Open the Explorer and move this file to the MICROBIT drive using the mouse. The programme starts automatically and the robot moves forward for 2000 milliseconds. |
INSTALL FIRMWARE |
The firmware is already installed on a new micro:bit. You only need this option if you want to update or overwrite the firmware if the micro:bit was previously programmed with another tool. |
|
REMEMBER YOU... |
If the micro:bit is connected to the computer with the USB cable, it will be visible as an external MICROBIT drive. If you are using the Chrome browser, the programmes are transferred via WebUSB. In WebTigerPython you use a yellow download button. If you are using a different browser, you must download your programme to the download folder on your computer using the Export code button and then move it to the MICROBIT drive using the mouse. The robot's power supply must be switched on for the motors to run. If the programme download does not work as described above, it may be because the correct firmware is not installed on your micro:bit. You can reinstall the firmware at any time. |
![]()