keyevents
Deutsch   English   

12. Key events


YOU LEARN HERE...


how you can influence the program flow by pressing keyboard keys. Similar to the mouse events, you define in a callback function what should happen when a keyboard key is pressed. The callback function is not called by the program, but automatically by the system when a key is pressed.


EXAMPLES


Example 1: When the r key is pressed, a red circle is drawn, the b key a blue circle and the g key a green circle.

You define a callback function onKeyPressed(key) . This returns the name or numeric code of the key pressed. You can use this keyboard input to set the color to red, blue or green. A filled circle is then drawn in the selected color.

The callback function is registered via a parameter of makeGPanel(). This tells the system that it should call this function every time the keyboard is clicked.


After starting the program, you must first click with the mouse in the graphics window, otherwise the keyboard clicks will be executed in the editor window.

Program:     

#Gp12a.py
from gpanel import *

def onKeyPressed(key):
    print(key)
    if key == 'r' or key == 82:
        setColor("red")
    elif key == 'b' or key == 66:
        setColor("blue")
    elif key == 'g' or key == 71:
        setColor("lime")    
    fillCircle(3)

makeGPanel(-10, 10, -10, 10, keyPressed = onKeyPressed)
print("Use key r, g, or b.")
► Copy to clipboard


Example 2: Change direction with cursor keys.
Your program reacts to pressing the UP, DOWN, LEFT or RIGHT cursor keys. In the callback function onKeyPressed(key) you define in an if-elif structure how the coordinates are to be changed when one of these keys is pressed. With WebTigerPython you use the key name ,with WebTigerJython the numeric code.
The program waits in an endless loop until a key is pressed and draws a short line in the corresponding direction.


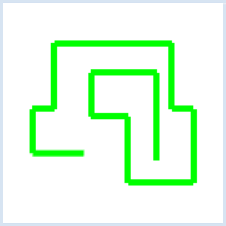
Since the value of the variables x, y is changed in a function, these variables must be defined as global.

Program:     

#Gp12b.py
from gpanel import * 
 
def onKeyPressed(key):
    global x, y
    if key == 'ArrowUp' or key == 38:
        y += 2 
    elif key == 'ArrowDown' or key == 40:
        y -= 2
    elif key == 'ArrowLeft' or key == 37:
        x -= 2
    elif key == 'ArrowRight' or key == 39:
        x += 2  

makeGPanel(-100, 100, -100, 100, keyPressed = onKeyPressed)
x = 0
y = 0
setColor("lime")
lineWidth(5)
print("Use cursor keys to move the cursor!")

while True:
    draw(x, y)
► Copy to clipboard


Example 3: Controlling a moving drawing cursor
In computer games, the keyboard is often used to control the gameplay. Your example is a first version of a snake game. The first time you press the UP key, the snake starts to move. You can change the direction by pressing one of the 4 cursor keys again.
This example is well suited for so-called state programming. By pressing the first cursor key, the snake is set to one state and remains in this state until it is set to a new state by pressing another cursor key.


In the callback function, you only define the state. The new coordinates are determined in the setMove() function. You can control the speed of the movement with delay().

Program:     

#Gp12c.py
from gpanel import *
 
def onKeyPressed(key):
    global state
    if key == 'ArrowUp' or key == 38:
        state = 'UP'
    elif key == 'ArrowDown' or key == 40:
        state = 'DOWN'
    elif key == 'ArrowLeft' or key == 37:    
        state = 'LEFT'
    elif key == 'ArrowRight' or key == 39:    
        state = 'RIGHT'

def setMove():
    global x, y
    if state == 'UP':
        y += 2 
    elif state == 'DOWN':
        y -= 2
    elif state == 'LEFT':
        x -= 2
    elif state == 'RIGHT':
        x += 2

makeGPanel(-100, 100, -100, 100, keyPressed = onKeyPressed)
x = 0
y = 0
setColor("lime")
lineWidth(5)
state = ''

while True:
    setMove()
    draw(x, y)
    delay(100)
► Copy to clipboard


Example 4: Stopping an animation with the Escape key.
Running applications can often be terminated with the Escape key. In your example, you can stop a simple animation with the Escape key and start it with the Enter key. You can repeat this process as often as you like. In this example, only the state is defined in the callback function and the program sequence is defined in a second function setMove(). Here you must first click in the graphics window before pressing the Enter and Escape keys.


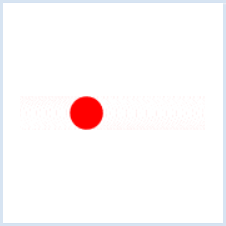
Program:     

#Gp12d.py
from gpanel import *

def onKeyPressed(key):
    global state
    if key == 'Escape' or key == 27:
        state = 'stop'
    elif key == 'Enter' or key == 13:
        state = 'go'

def setMove():
    global x, dx
    if state == 'go':
        x = x + dx    
        if x > 80 or x < -80:
            dx = -dx
    elif state == 'stop':
        return  

makeGPanel(-100, 100, -100, 100, keyPressed = onKeyPressed)
x = 0
y = 0
dx = 1
state = ''

while True:
    setMove()
    pos(x, y)
    setColor("red")
    fillCircle(5)
    delay(10)
    setColor("white")
    fillCircle(5.2)    
► Copy to clipboard


REMEMBER YOU...


The callback function onKeyPressed(key is not called by your program, but by the system when you have pressed a key. You can display the name of the keys, in particular the special keys, in the output window with print(key). The callback function is registered as a parameter of makeGPanel(). The callback function should not contain any longer program blocks.


TO SOLVE BY YOURSELF


1.


The square initially has a side length of 20. Each time the UP key is pressed, the square should be enlarged, and each time the DOWN key is pressed, the square should be reduced. To make the reduction of the circle visible, you must erase the previously drawn larger square (paint over it with white paint).


2.
Complete the program in example 3 so that the game ends when the snake touches the edge of the window. The text “Game Over” should then appear in the output window.  

3.

You can develop the snake game even further. In the real snake game, the snake must not cross the already drawn track. to do this, use the function
getPixelColorStr(x, y), which returns the color in the point (x, y).
In WebTigerPython the color name (e.g. “red”, “green” etc.)
In WebTigerJython the hex string (e.g. #ff0000, #00ff00 etc.).